There have been several conversations lately on some of the classical homeschooling boards I frequent about one of those activities that is always suggested when you’re studying the ancients: mummifying a chicken. And I thought that, since it’s at least sort of seasonally relevant (Halloween . . . . mummies?), it might be fun to share our experiences with our mummification project from last year.
We’re vegans, so sacrificing an animal for this purpose was out of the question. I did some research for alternate ideas and, as usual, ended up drawing from a number of sources and putting our own spin on the idea.
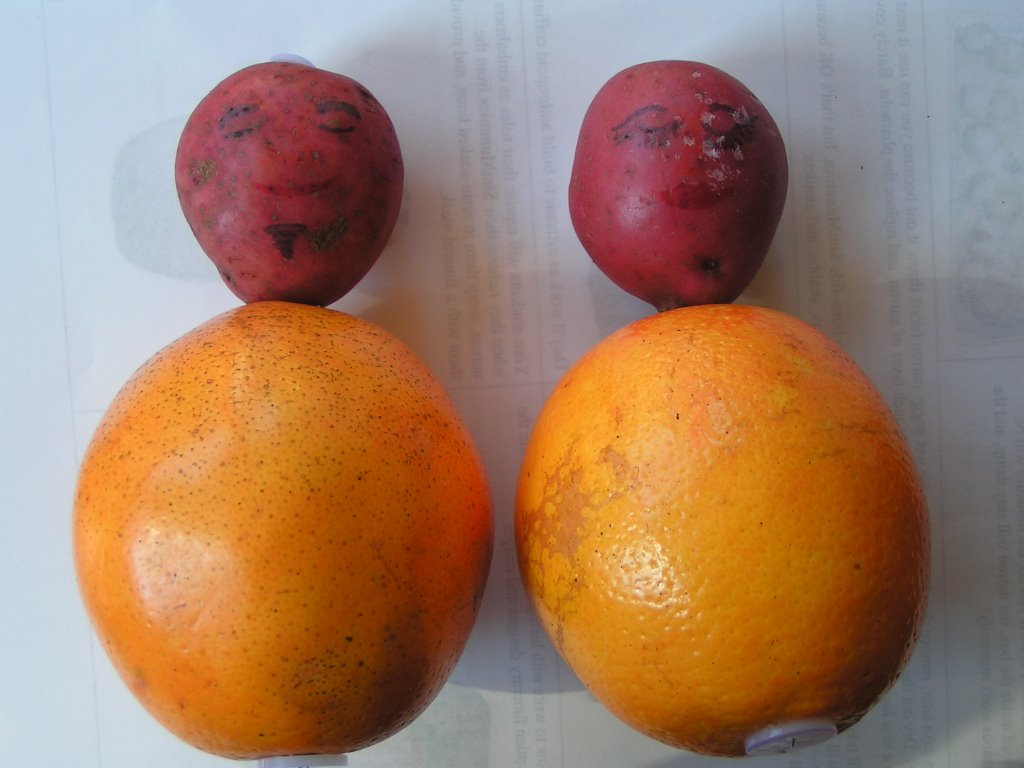
The first step was figuring out what, exactly, to mummify. I ended up assembling two little “bodies” using oranges and small, new potatoes, held together with wire. I drew faces on the potatoes--one male and one female—and explained to Moonheart and RobotBoy that these were the bodies of the pharaoh and his beloved wife, tragically killed by some mysterious ancient disease.
My students were appointed the official royal embalmers and went immediately to work.
They made an incision on the side of each abdomen and used the appropriate ritual tools to remove as many of the “internal organs” as possible. (Crochet hooks of various sizes and some spoons worked pretty well for this.) They saved all the orange flesh and seeds to package up and mummify separately.
Meanwhile, I mixed up a batch of “natron,” made by combining equal parts baking soda and salt.
Once the kids got tired of pulling out gooshy bits, the bodies were ready to be cleansed and anointed with “wine.” (I poured a bit of rubbing alcohol into a pretty bottle that had once held maple syrup and added a couple of drops of red food coloring.) After that, they made little packets of natron wrapped in fabric with which to stuff the body cavities of the mummies-to-be. They inserted the packets, sprinkled on some spices (mostly cinnamon powder), then turned their attention to the “organs.” They gathered up as much of the orange flesh and seeds as possible and wrapped them up into little packets inside paper napkins. We tied off each packet with a bit of string and wrote an initial to identify which organs belonged to which body. Then, we placed both bodies and the organ packets into an aluminum foil baking dish and surrounded it all with more natron.

We let them sit for several days, until the natron got really soaked and crusty. Then I removed it and replaced it with a fresh layer, after which we let them sit there desiccating for another few weeks. In the meantime, we went to work on their funeral goods and furnishings.
First up, was the coffins. I traced an outline roughly the shape of the bodies—with plenty of extra room to accommodate their eventual wrappings—onto cardstock. In retrospect, it would have been better to go with something a bit heavier for the top and bottom, since we found the cardstock had a tendency to warp later in the process. We used a combination of tape and glue to make the sides of the coffins by attaching strips of cardstock to the bottom. The kids then covered both inside and outside, top and bottom of each coffin with papier mache. (We left the lid alone for the moment, by the way. More on that later.)
By the way, I want to make it clear that this entire process unfolded over the course of about two months. We’d work on individual projects a little at a time, one or two afternoons a week. During the same period, we were continuing our study of ancient Egypt, which provided us with lots of ideas for things to add to our royals’ funereal outfittings. We watched several videos and DVDs and did a couple of great field trips to museum exhibits of Egyptian art and artifacts, including the wonderful Tutankamen exhibit that traveled the United States last year.
When next we had a chance for a craft project afternoon, I broke out the air-drying terra cotta clay and put my apprentice embalmers to work making canopic jars, amulets and shabtis, as well as some facial features to use on the coffin lids. To streamline the process just a bit, each kiddo made a single canopic jar, instead of the traditional four, since each mummy had yielded only one packet of “organs.”

Once all the clay pieces were dry, they were painted. We chose a reasonably accurate bright blue for the amulets and shabtis, but my young artists went a bit farther afield in decorating the canopic jars and other pieces.
The kids also painted the coffins with assorted designs inspired by our reading, research and field trips. They embellished the lids of the coffins by gluing down the facial features and other materials, then doing a thin layer of papier mache over the top. As a finishing touch, they later applied gold leaf.

About six weeks after we first put them in the natron, we decided the bodies were ready to wrap. It was pretty amazing to see and feel how dehydrated they had become.

Each little “body” got a base layer of wrapping made with strips of fabric brushed with the glue-flour-water mixture we used as a stand-in for resin. Once the first layer was dry, the kids did another round of wrappings, this time tucking in the amulets they had made and painted.

Each little packet of internal organs was also wrapped
We did a few final touches, including tiny beaded necklaces and, for one of them, an aluminum foil mask.

We also provided our tiny mummies with a few neccessities for the afterlife, including loaves of (salt dough) bread and faux alabaster vessels representing assorted other foods and beverages. Finally, the wrapped organ packets were placed into their waiting canopic jars and sealed. When all was said and done, we ended up with a very impressive little display, which is now spending eternity on top of a bookcase in our living room.

This was, truly, a wondeful project, both fun and educational. I just hope I can come up with something to top it this year!
2 comments:
I followed your link from WTMS. Thanks so much for the vegan alternative to the chicken mummy!
Hi! I loved your instructions on how to make orange mummies. My kids and I started the process yesterday and had a great time. To give you credit for the instructions, I linked to your post from my blog. I hope that's okay! If it's not, let me know and I'll take the link down.
Thanks for the fabulous instructions!
Tracie
Post a Comment